Amazon has a repricing feature called “Automate Pricing”. As the name implies, it’s a feature that lets you update the price of a given SKU, or update prices across your entire catalog to help you stay ahead of your competition. The system is set to update your listing price whenever there’s an event like a new buy box price, or when there’s a price change by another seller, depending on your repricing rules.
Steps to Setup Automated Pricing
- Login to your Seller Central account.
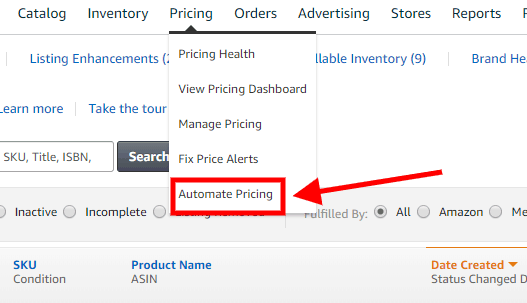
- Navigate to the top tool bar, & hover over Pricing.
- Click on Automate Pricing as shown below.
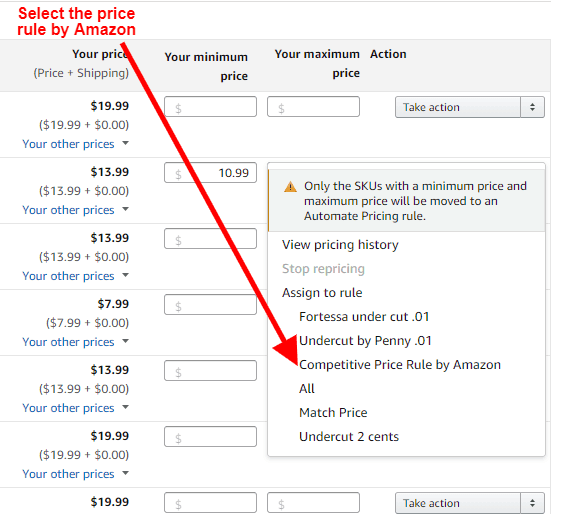
- Create your pricing rule. You can either use a Pre-Defined Automated Pricing rule or Create your own Pricing Rule. To use the Pre-Defined Automated Pricing Rule, click on Edit SKUs under the action column:

- Select the SKU you want to set the Automated Pricing for, enter your minimum and maximum price, then select “Competitive Price Rule by Amazon” from the drop down under Take Action.
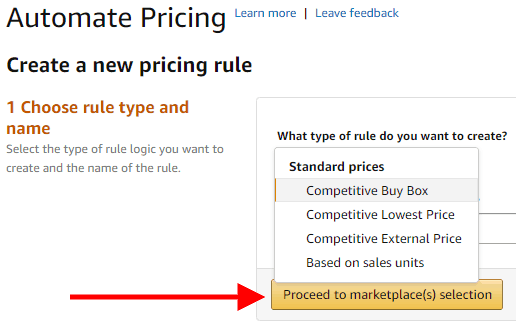
- To Create your own Pricing Rule, click on Create a Customized Pricing Rule as shown below.

- Enter a name for your pricing rule, select a rule from the drop down, then click on proceed to marketplace selection.
- Select the marketplace where you intend to use Automate Pricing, click on save and continue to select rule parameters.
- Define your rule parameters, then save to proceed to SKU Selection.

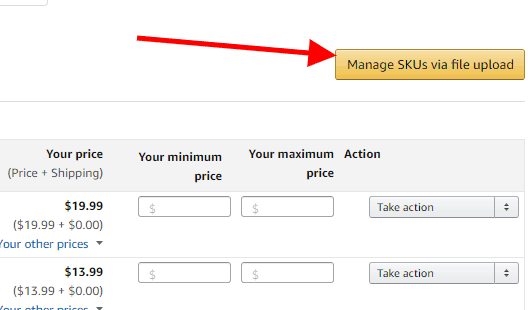
- You can either select a SKU from your catalog, or do a file upload if you intend to set the repricer for multiple SKUs. Select the SKUs, set your minimum and maximum price, then choose the pricing you created. For file upload, click on Manage SKUs via File Upload.
- Download the Automated Pricing File Template.

- Enter required values as shown below and upload your template.
- Click on Upload Center to upload file. NOTE: you might need to convert your file to a .txt file before you upload the template.

How to Pause or Delete a Pricing Rule
You can edit, pause or delete the pricing rule at any time.
- Click on Automate pricing under Pricing at the top tool bar of your Seller Central account.
- Click on Action under Your Customized Automate Pricing Rules, then select pause or delete as shown below.

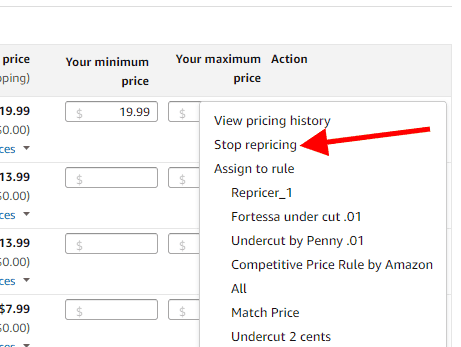
- Click on Action from the Automate Pricing page, click on Take Action, then click on Stop Repricing to stop the repricer for that specific SKU.
Follow our Full Service Amazon Agency for more tips. If you’re interested in asking Amazon Experts for help, our Amazon Agency is ready to serve you.


